awk -f dpexample.awk dp.crd > dpexample.crd
the fiber positions in arcseconds (dp.crd) are rotated by 45° and
offset to the positions mentioned above. The new positions are saved in the
file dpexample.crd, which has six columns (ra, dec for first DensePak, ra,
dec for second DensePak, ra, dec for third DensePak).
Important: You have to edit the program dpexample.awk, so that it fits your coordinates. This means, you have to change the position angle (the number 45 in line 2) and the offsets of the DensePak observations in lines 6-11. If you want to plot only one observation, delete lines 8-11 and replace line 12 by
printf ("%9.8f %9.7f \n",ra1,dec1)
- line 1: image name and image section
- line 3: xstart xend ystart yend in absolute pixels of your image section (xstart and xend are reversed in dpexample.igi to flip the image around the y-axis)
- line 5: minimum and maximum pixel intensity (they are reversed in dpexample.igi to get a negative plot, i.e. white sky and dark emission)
- line 8: xstart xend ystart yend in world coordinates (again, xstart and xend are reversed to flip the coordinate system as well)
- line 9: format of the tickmarks, if you don't use h m s and o ' "
- line 10: tickmarks xsmall xbig ysmall ybig
- lines 12, 15: coordinate system you used
- line 13: x and y position (in world coordinates) for the y-axis label
- line 18: name of your table of transformed fiber positions
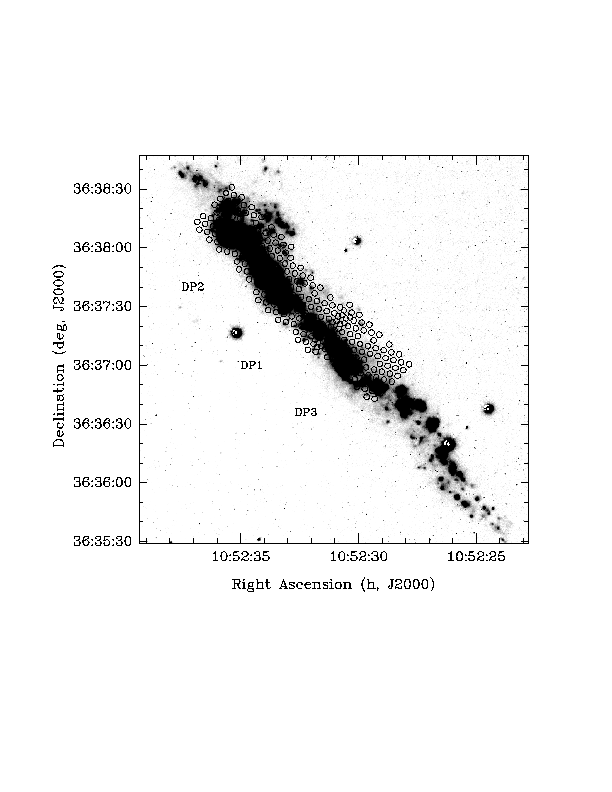
- lines 24-36: can be deleted, if you only have one DensePak observation
- lines 31, 33, 35: x and y positions (in world coordinates) of labels, if you have three DensePak observations and want them labeled
We use the range .2 to .9 for the x-axis (see line 2 in dpexample.igi). To get the proper scaling for the y-axis, use the equation
y = (8.5 * 0.7 * number of pixels in y) / (11 * number of pixels in x)
For our example of a 1007x1005 pixels image section, we get y=0.53983, thus
a range for the y-axis of .3 to .83983.
        st>igi < dpexample.igi
        st>gflush
A postscript file psk....eps will be created in the same directory
where the image etc. are.
!!!We are not done yet!!!
The x-axis is 137.5mm or 3' 18". The fiber diameter is 3". Thus, we need a fiber diameter of
diameter = (137.5mm * 3") / (3' 18") = 2.1mm
An expanding factor of .6 (line 21 in dpexample.igi) yielded a
fiber diameter of 3mm in the plot. Thus, we need an expanding factor of
expand = (0.6 * 2.1mm) / 3mm = 0.4